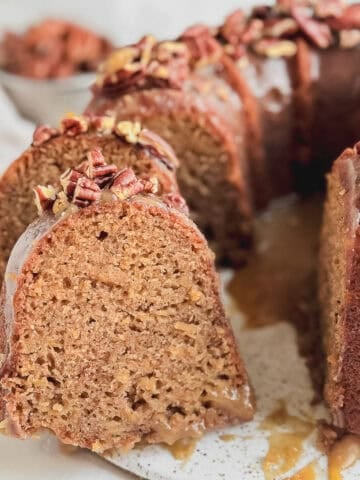
This Moist Oreo Pound Cake is deliciously rich, chocolatey, and full of Oreo flavor!! With a tender, slightly dense crumb, this cookies and cream cake is packed with crushed Oreos and topped with a decadent cream cheese glaze. If you love Oreos and chocolate, then you'll love this fun twist on the traditional Southern chocolate cake. Made from scratch with simple ingredients, this crowd pleasing dessert is sure to satisfy all of your chocolate cravings.

Get ready to meet your new cake obsession!! This Oreo chocolate cake recipe is perfect for the cookies and cream lover in your life. It is made with a combination of dutch process and black cocoa powder to enhance the Oreo flavor and topped with a tangy cream cheese glaze and extra crushed Oreos!! Incredibly rich, with a melt in your mouth delicate crumb, you'll find it hard to stop at just one bite.
This Oreo pound cake is a spin on the traditional Southern chocolate cake your grandmother use to make but with a few upgrades. Bundt cakes have a reputation for being intimidating but my with my easy to follow instructions and tips below you can finally drop the box mix and create the perfectly moist pound cake of your dreams!!
Looking for more inspired Oreo desserts? Try my Easy Oreo Muffins, Oreo Bread, or Easy and Chewy Peanut Butter Oreo Cookies!!
Why You'll Love This Oreo Pound Cake
- Oreo flavor - This Oreo cookie cake tastes just like a giant Oreo!! Not only are crushed Oreos added to the cake batter and used to decorate the cake but the vanilla filling is used to make the delicious cream cheese glaze!!
- Easy to make - This easy Oreo cake is perfect for beginner bakers and experienced bakers alike!! Not only are the simple steps easy to follow but this recipe uses ingredients you likely already have in your pantry.
- Perfect for any occasion - Whether you are serving a crowd or just looking to satisfy your sweet tooth, this crowd pleasing cookies and cream dessert is the perfect centerpiece for your next gathering or special occasion.
Recipe Ingredients
You'll need the following ingredients to make this Moist Oreo Pound Cake:


Here are a few notes on the ingredients used to make this Easy Oreo Cake recipe:
- Oreos - I used classic, regular Oreos for this recipe!! You can also use gluten free Oreos if needed.
- Cake Flour - Cake flour is great for creating a soft cake with a light and tender crumb. If you do not have cake flour, you can substitute with all purpose flour or 1 to 1 cup of gluten free flour.
- Cocoa Powder - To really amp up the Oreo flavor, I used a combination of dutch process and black cocoa powder. Black cocoa powder is one of the main ingredients used to make Oreos. It is rich and earthy in flavor and also gives the Oreos their dark hue. I used King Arthur Black Cocoa Powder.
- Buttermilk - Buttermilk helps give this cake a moist, tender crumb and provides a slight tang.
- Vegetable Oil - Vegetable oil makes this cake extremely moist and rich. You can use vegetable or canola oil.
- Cream Cheese - Cream cheese and the vanilla filling from the Oreos are combined to make the silky glaze that tops this Oreo bundt cake. Cream cheese pairs perfectly with Oreos and enhances the Oreo flavor.
See the recipe card below for a full list of ingredients and measurements.
Substitutions and Variations
Bundt cakes are the perfect dessert. They are simple to make, easy to decorate, and there are no layers to worry about!! More importantly, they are easily adaptable and can be customized any way and with any flavors you wish. Here are some of the ways you can make this simple Oreo cake recipe your own.
- Use different Oreos - Change up the Oreos and add any Oreo flavor you like!! Red velvet Oreos would be a delicious addition.
- Add chocolate chips - Increase the chocolate factor and add some chocolate chips to the batter. I recommend using up to one cup of mini semisweet or dark chocolate chips. Milk or white chocolate will make the cake too sweet.
- Make a vanilla Oreo cake - If you prefer a vanilla cake, you can make a vanilla bundt cake instead and add the crushed Oreos to the vanilla cake batter.
- Change up the glaze - If you are not a fan of cream cheese, you can top this cake with a vanilla or chocolate glaze instead. Either one would go perfectly with this Oreo pound cake.
This recipe has not been tested with other substitutions or variations. If you happen to try any from the list above or add your own spin with new ingredients, please let us know how it turned out in the comments below.
How to Make Chocolate Oreo Cake - Step by Step Instructions
Bundt cakes are by far my favorite cakes to bake. But even with their ease and simplicity, they are know to be tricky to get just right. Fear not, below I will guide you through the step by step process I use to ensure bundt cake perfection every time.
Before you start, preheat the oven to 350 F. Spray a 12 cup bundt pan with non stick baking spray.

Step 1: Mix the dry ingredients. In the bowl of a stand mixer fitted with the paddle attachment sift together the cake flour, cocoa powders, baking powder, baking soda, and espresso powder. Whisk in sugar and salt.

Step 2: Mix the wet ingredients. In a separate medium bowl, whisk together eggs, buttermilk, vegetable oil, and vanilla extract until combined.

Step 4: Mix the wet and dry ingredients. With the mixer on low, slowly add the wet ingredients to the dry ingredients. After adding all of the wet ingredients, increase the speed to medium and mix until fully combined, stopping to scrape the sides and bottom of the bowl. Reduce speed to low and slowly add the hot water mixing until just combined. Remove bowl from the stand mixer and add the crushed Oreos. Using a rubber spatula, gently fold in the crushed Oreo pieces until combined.

Step 5: Bake!! Pour batter into the prepared pan and bake for 45 to 50 minutes, or until a toothpick or cake tester comes out clean.

Step 6: Cool. Allow the cake to cool in the pan on a wire rack for 10 minutes. Invert cake from the pan on to the wire rack and cool completely.

Step 7: Cream cheese glaze. Beat the cream cheese and powdered sugar together. Add in the vanilla, milk, and Oreo filling and beat until combined. It should be a pourable consistency. Pour cream cheese glaze over cake and top with extra crushed Oreos. Enjoy!!
Expert Baking Tips
- Properly measure your flour. For best results, I recommend weighing your ingredients, especially the flour. If you do not have a food scale, start first by fluffing your flour. Fluffing will create air between the flour particles and it will no longer look compressed. Next, spoon the flour into a measuring cup and level it off using the back of a butterknife. Avoid directly scooping into the flour with a measuring cup. This will add more flour to the recipe resulting in a dry cake.
- Use room temperature ingredients. Room temperature ingredients ensures that the ingredients mix together easily. This helps us to not over-mix the batter and creates an even, moist cake. Allow your ingredients to come to room temperature two hours prior to baking.
- Scrape the bowl. When adding your wet and dry ingredients, be sure to scrape the bottom and sides of the bowl. This ensures everything is mixed evenly and that there are no bits of flour left at the bottom of the mixing bowl.
- Greasing the cake pan. Generously grease your baking pan with a non stick baking spray with flour. This will help release the cake easily after baking. I like to use Baker's Joy.
- Removing the cake. Bundt cakes should only be left to cool in the pan on a cooling rack for 10 minutes. Any longer will result in the cake sticking to the pan. This time allows the cake to cool enough where its still warm but won’t fall apart when inverting it onto a wire rack.
- Cool before you glaze. Allow your cake to cool completely before glazing. If you glaze your cake while it is still warm, the glaze will melt and slide off the cake.
- If your do not have black cocoa powder, you can use an equal amount of dutch process cocoa powder.

Recipe FAQs
Yes!! You can use an equal amount of all purpose flour or gluten free flour instead of cake flour if needed.
Dutch process cocoa powder is cocoa powder that has been washed with a potassium carbonate solution, neutralizing its acidity to a pH of 7. It has a darker color and a smooth, earthy flavor. Black cocoa is similar to Dutch process as it has also had its acidity neutralized but it is heavily alkalized for a longer time giving it a pH of 8. This process is what gives it a very dark color and a low fat content. Black cocoa is also very smooth but richer in flavor. It is best to use black cocoa in small amounts and in conjunction with dutch process cocoa powder to enhance the chocolate flavor but also add fat back into the baked good.
This cake can definitely be made the day before and stored in an air tight container at room temperature until ready to serve. I recommend glazing the cake on the day you plan to serve it. But if you are short on time and would also like to glaze it the night before, store the cake in an air tight container in the refrigerator until ready to serve.
Besides the flavor, good pound/bundt cakes depend on an accurate measurement of ingredients, proper mixing to create a light, tender crumb, room temperature ingredients, and baking the cake at the correct temperature.

Storage
Room Temperature
Store the fully cooled, unglazed Oreo chocolate cake in an airtight container for 3 to 5 days.
Refrigerator
Store the glazed Oreo bundt cake in an airtight container in the refrigerator for up to 5 days.
Freezing
I recommend freezing this cake unglazed. Wrap the cooled cake in plastic wrap then foil. Place in a freezer bag and freeze up to 3 months.
More Cake Recipes


It brings me so much joy when you make one of my recipes!! If you try this recipe and love it much as I do, please give it a star rating in the recipe card below. And don't forget to tag me to share your creation with me!! You can find me on Instagram @vintage_confections and Pinterest.
📖 Recipe

Moist Oreo Pound Cake
Equipment
- 1 12 cup Bundt Cake Pan
Ingredients
Oreo Pound Cake
- 1 ¾ (219 g) cup Cake Flour
- ¾ (64 g) cup Dutch Process Cocoa Powder
- ¼ (21 g) cup Black Cocoa Powder
- 2 teaspoons Baking Powder
- ½ teaspoon Baking Soda
- 1 teaspoon Espresso Powder
- 1 ¾ (350 g) cup Granulated Sugar
- ¾ teaspoon Kosher Salt
- ½ (112 g) cup Vegetable Oil
- 3 large Eggs room temperature
- 1 (240 g) cup Buttermilk room temperature
- 1 tablespoon Vanilla Extract
- 1 cup Hot Water
- 18 Oreo Cookies crushed, plus extra for top of cake
Cream Cheese Glaze
- 4 oz Cream Cheese room temperature
- 1 ½ (180 g) cup Powdered Sugar sifted
- 4 (60 g) tablespoons Milk
- Vanilla Filling from 2 Oreo Cookies
- ½ teaspoon Vanilla Extract
Instructions
For the Oreo Pound Cake
- Preheat oven to 350 degrees F. Spray a 12 cup bundt pan with non stick baking spray. Using a fine pastry brush, spread baking spray to coat the pan making sure to get into all the nooks and crannies. Set aside.
- In the bowl of a stand mixer fitted with the paddle attachment, sift together the cake flour, cocoa powders, baking powder, baking soda, and espresso powder. Whisk in the granulated sugar and salt.1 ¾ (219 g) cup Cake Flour, ¾ (64 g) cup Dutch Process Cocoa Powder , ¼ (21 g) cup Black Cocoa Powder , 2 teaspoons Baking Powder , ½ teaspoon Baking Soda , 1 teaspoon Espresso Powder , 1 ¾ (350 g) cup Granulated Sugar , ¾ teaspoon Kosher Salt
- In a small saucepan, heat water until simmering and hot.1 cup Hot Water
- In a separate medium bowl, whisk together vegetable oil, eggs, buttermilk, and vanilla extract until combined.½ (112 g) cup Vegetable Oil , 3 large Eggs, 1 (240 g) cup Buttermilk , 1 tablespoon Vanilla Extract
- Using the paddle attachment with the mixer on low, slowly add the wet ingredients into the dry ingredients. After adding all of the wet ingredients, increase the speed to medium and mix together until combined, stopping to scrape the sides and bottom of the bowl.
- Reduce speed to low and slowly add the hot water and mix until just combined. Remove bowl from the stand mixer and add in the crushed Oreos. Using a rubber spatula, gently fold in the crushed Oreo pieces until combined.18 Oreo Cookies
- Pour batter into prepared pan. Bake for 45 to 50 minutes, until a toothpick or cake tester comes out clean.
- Remove cake from oven and allow it to cool in the pan on a wire rack for 10 minutes. Invert cake onto wire rack to cool completely.
For the Cream Cheese Glaze
- In a medium bowl, beat cream cheese with a hand mixer on high for 1 minute. Add in the sifted powdered sugar and mix on low until combined. Increase to high speed and beat until smooth.4 oz Cream Cheese, 1 ½ (180 g) cup Powdered Sugar, 4 (60 g) tablespoons Milk , Vanilla Filling from 2 Oreo Cookies , ½ teaspoon Vanilla Extract
- Using a butterknife, scrape vanilla filling from 2 Oreo cookies. Place filling in a small bowl and heat in the microwave for about 20 seconds. Add vanilla filling, milk, and vanilla extract to cream cheese mixture. Mix glaze on high until combined. It should be a pourable consistency.
- Place cooled cake on cooling rack with a cookie sheet underneath. Pour cream cheese glaze over cake and top with extra crushed Oreos. Enjoy!!


MaryAnn
very delicious
Lauren
Thank you so much MaryAnn!! I am so glad you think so. It's definitely one of my favorites :).
Vannessa
Ohh Lauren, this sounds so delicious. I am going to try and make this. I love Oreo cookies, so I know I will love this!!! Thanks, Nessa 😀
Nancy Thomas aka Nanu
this really fun awesome I really want to try it. 🙏mmm Good.
Lauren
Thank you so much Nancy!! Let me know if you try it!!
Nancy Thomas aka Nanu
please keep it going in your family's name to go down in our generation make sure you put the date on it. you can name it in one of the older generation
Timothy Caras
a delicious cake
Lauren
Thank you Tim!! I think so too :).
Beronica B
The perfect amount of everything! Flavorful dessert
Lauren
Awwww thank you Beronica!! I totally agree, this cake is bursting with flavor!!
Pamela
Very delicious cake! love the step by step clear instructions. Will definitely be making it again!
kris
I made this cake this weekend and it is delicious!!
Myra
Lauren,
This will be perfect for my Labor Day celebration!! Oreo cookies is a childhood favorite, not to mention how moist it looks.
Thanks so much for sharing your family stories.
Kindly,
MLN
John
omg cant wait to make this
Ariel
Crazy amazing cake! My new obsession.
Kian
This is wonderful!
Gracella
It’s really good recipe!!! Love the taste and the texture!
Sarah
Fabulous cake!!
Latonya
I love the presentation the cake looks like you can eat it from the screen! And you can tell that it was made with a lot of love ❤️
Nathan
I consider myself a dessert connoisseur and I can confidently say this was a delightful gift for my palate. It has a perfect balance of sweetness with chocolate goodness. I would highly recommend trying out this recipe.
Jackie
Fantastic recipe! I was able to bang this out the day of hosting friends for dinner and it was well received! It's moist and flavorful. I did not change a single thing.
My only question is that I made the icing glaze as is, exactly with the same ratios and ingredients and found the glaze to be too runny. I let the cake sit a good 5-6 hours as well. In the future I would add the milk in last, 1 TB at a time. To adjust, I added powdered sugar until it was a thicker consistency and salt to adjust the flavor.
Thank you again for a fantastic recipe!
Lauren
Jackie, thank you so much for your comment, it made my day!! I am so glad you enjoyed the recipe and that your guests did as well. For the glaze, if it was too runny for you, you did the right thing by adding more powdered sugar. Thank you so much for trying the recipe!!